
Loop engineering: the evolution of prompt engineering
What is loop engineering, the concept developed by Boris Cherny and Addy Osmani that redefines how we work with AI? The 6 parts of a good loop, with a real-world example.
Today I’d like to write about a topic that’s a little more technical, but one you’ve no doubt seen a lot of lately: loop engineering.
What’s behind this concept that’s been in the spotlight following recent statements by Boris Cherny, head of Claude Code?
"I'm no longer prompting Claude. I'm just running a loop that prompts him and then figures out what to do next. My job is to write loops."
What lies behind this term is nothing new for those of us who love technology: it’s the pursuit of automation and the elimination of repetitive tasks. And it seems to be the natural evolution of prompt engineering.
From Prompt to Loop
For quite some time, working with AI was conversational: I type, the AI responds, I read, I decide the next step. Prompt engineering focused on improving that conversation: how to write each instruction better, how to provide better context, how to phrase requests to get better results.
Loop engineering proposes something else: instead of writing each prompt, I design the process that will execute those prompts for me, in a programmed way and based on an objective. I step out of the loop—where I used to give instructions one step at a time—and move on to designing the mechanism that does it for me.
Addy Osmani, who popularized and coined the term a few days ago in this post, sums it up this way: a loop can be thought of as a recursive goal, where I define a purpose and the AI iterates until it’s completed.
The 6 Parts of a Good Loop
Osmani argues that a well-designed loop has six components:
Automations. A timer that starts the job on its own, without me having to press a button.
Worktrees. Separate work areas, so that two AI assistants don’t step on each other’s toes.
Skills. Saved instructions that teach the AI how I perform a task, so it stops guessing.
Connectors. Connections to the actual tools I already use (Gmail, Slack, Notion, GitHub, etc.).
Sub-agents. One AI does the work; another reviews it.
Memory. A notes file that lives outside the chat and keeps track of what’s been done and what’s left to do.
In practice, this translates to automations, worktrees, skills, connectors, sub-agents, and memory. And the interesting thing is that both Claude Code and Codex already have the pieces to put these six components together.
In Claude, for example, this is seen with commands like /goal, which defines a success condition and lets the AI iterate until it meets it, and /loop, which repeats a prompt at a defined interval. Let’s look at some examples of these commands:
$ /goal all tests in test/auth pass and the lint step is clean
$ /loop 5m check if the deployment at localhost:3000 is responding and tell me the HTTP status code
A concrete example: processing photos of receipts
To bring this down to earth, let’s think about a very everyday task: entering expenses based on photos of receipts.
I have a skill, GetExpense, that receives an image of a receipt or invoice, extracts the key metadata, and adds it to an Excel spreadsheet (creating one if it doesn’t exist).
The goal of the loop is simple: have it check a folder where I save photos of receipts, and as long as there are unprocessed images, use that skill and leave me a note in Notion with the summary.
In the folder where you keep your receipt photos, open a Claude session (you can use Claude CLI or the “Routines” feature in the Claude IDE).
The /goal would look something like this:
Revisá esta carpeta y listá todos los archivos de imagen (jpg, jpeg, png, heic, pdf).

Si no existe la subcarpeta /procesados/, creala.

Para cada archivo encontrado, lanzá un thread independiente que:

1) lea el archivo de imagen,
2) llame a la skill "ObtenerGasto" pasándole la imagen,
3) si la skill termina exitosamente, mueva el archivo a /procesados/,
4) si la skill falla, registre el nombre del archivo y el error, deje el archivo en su lugar y continúe con los demás.

Seguí procesando hasta que no haya más imágenes.

Cuando todos finalicen, armá una nota en mi página "Notas rápidas" de Notion con: cuántos archivos se encontraron, cuántos se procesaron exitosamente, y la lista de los que fallaron y por qué.
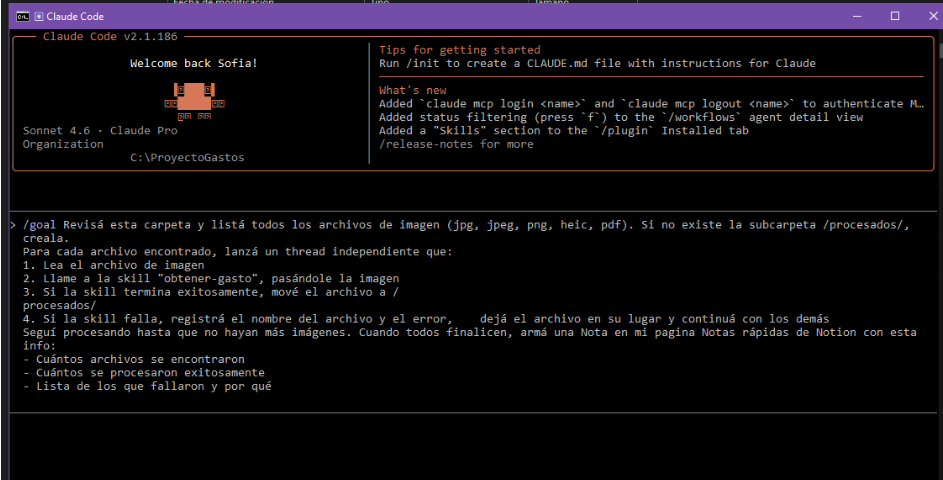 /goal in Claude CLI
The nice thing about this example is that it shows the entire pattern:
the loop identifies the task (the files in the folder),
executes it (calls the skill),
verifies it (success or error),
and leaves a record outside the chat (the note in Notion) so that the next run knows what’s left to do.
If I want to take it a step further, I can have each file processed by a separate subagent, all running in parallel, rather than one by one.
Revisá esta carpeta y listá todos los archivos de imagen (jpg, jpeg, png, heic, pdf).

Si no existe la subcarpeta /procesados/, creala.

Para cada archivo encontrado, lanzá un subagente independiente usando la herramienta Agent (subagent_type: general-purpose), uno por archivo, todos en paralelo (múltiples llamadas a Agent en el mismo turno, no una por una).

A cada subagente dale un prompt autocontenido con:

- La ruta absoluta del archivo de imagen.
- La instrucción de llamar a la skill "ObtenerGasto" pasándole esa ruta.
- Qué hacer si la skill termina bien: mover el archivo a /procesados/.
- Qué hacer si falla: NO mover el archivo, y devolver el nombre del archivo + el motivo del error como resultado del subagente.

Esperá a que todos los subagentes terminen. Con los resultados, armá una Nota en mi página Notas rápidas de Notion con: cuántos archivos se encontraron, cuántos se procesaron exitosamente, y la lista de los que fallaron y por qué.
And that’s where the three best practices I consider most relevant come in:
define a measurable final state (a test result, an exit code, an empty queue)
establish a clear verification (how you’ll check that it worked)
set meaningful constraints (what things shouldn’t change along the way)
What Doesn’t Change
Beyond the technical aspects, there’s something I find central and worth highlighting: a poorly designed loop doesn’t make us more efficient—it simply multiplies errors at a faster rate, with fewer people watching. Verification remains our responsibility. And if we stop understanding what the system produces, what we gain in speed we lose in judgment.
That’s why I don’t see loop engineering as a way to distance ourselves from the work, but rather as a different way to remain engaged in it: no longer writing every instruction, but carefully designing the conditions under which AI can act without us watching every step.
See you next time! P.S.: If you’re interested in leadership, innovation, technology, and how to empower multicultural teams, I invite you to follow me on Substack. Subscribe here and get every new post in this series instantly. 🚀🌍